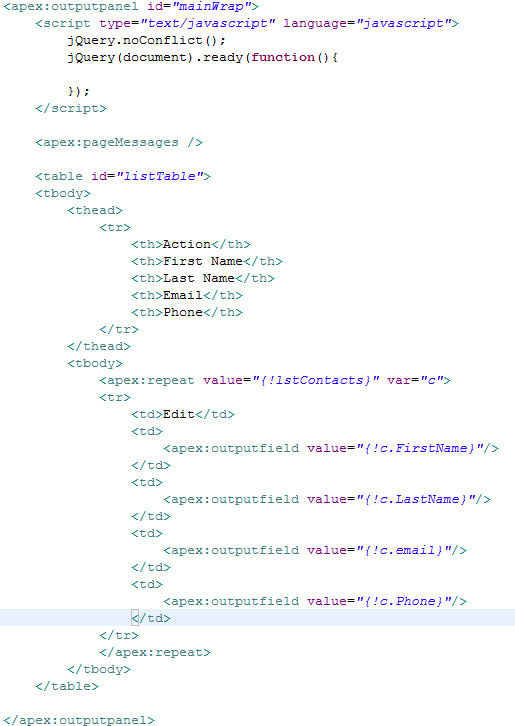
Showing posts with label CSS. Show all posts

Tuesday, March 20, 2012

Batman logo in CSS3 - no images

I was playing with the CSS3 rounded corners and thought that a neat challenge to give myself would be to try to create the Batman logo without images.

the markup:

<div id="main_wrap">
    <div id="left_side">
      <div id="left_wing" >
        <div id="left_middle_top" ></div>
        <div id="left_middle_bottom" >
          <div id="left_bottom_one"></div>
          <div id="left_bottom_two"></div>
        </div>
      </div>
    </div>
    <div id="middle">
      <div id="middle_top"></div>
    </div>
    <div id="right_side">
      <div id="right_wing" >
        <div id="right_middle_top" ></div>
        <div id="right_middle_bottom" >
          <div id="right_bottom_one"></div>
          <div id="right_bottom_two"></div>
        </div>
      </div>
    </div>
  </div>

it even kinda looks like a bat just with the markup lol... but this is all nothing without the CSS

    #main_wrap {
      width:80%
      margin:15px auto;
    }
    #left_side #left_wing {
      height:300px
      width:230px;
      background-color:#000000;
      float:left
      position:relative
      left:12px
      -moz-border-radius-bottomleft: 75px 150px
      border-bottom-left-radius: 75px 150px
      -moz-border-radius-topleft: 75px 150px
      border-top-left-radius: 75px 150px
    }
    #left_side #left_middle_top {
      height:130px
      width:200px
      background-color:#ffffff
      float:left
      z-index:10
      position:relative
      left:40px;
      -moz-border-radius-bottomleft: 120px 120px
      border-bottom-left-radius: 120px 120px
      -moz-border-radius-bottomright: 100px 120px
      border-bottom-right-radius: 100px 120px
      -moz-border-radius-topleft: 100px 120px
      border-top-left-radius: 100px 120px
    }
    #left_side #left_bottom_one {
      height:130px
      width:95px
      background-color:#ffffff
      float:left
      z-index:10
      position:relative
      left:40px
      top:40px;
      -moz-border-radius-bottomleft: 90px 120px
      border-bottom-left-radius: 90px 120px
      -moz-border-radius-topright: 90px 120px
      border-top-right-radius: 90px 120px
      -moz-border-radius-topleft: 90px 120px
      border-top-left-radius: 90px 120px
    }
    #left_side #left_bottom_two {
      height:150px
      width:126px
      background-color:#ffffff
      z-index:11
      position:relative
      float:left
      top:50px
      left:40px;
      -moz-border-radius-topright: 90px 120px
      border-top-right-radius: 90px 120px
      -moz-border-radius-topleft: 90px 120px
      border-top-left-radius: 90px 120px
    }
    #middle{
      width:90px
      height:300px
      background-color:#000000
      float:left
      z-index:5
      position:relative
    }
    #middle #middle_top {
      height:50px
      width:38px
      background-color:#ffffff
      z-index:10
      position:relative
      float:left
      left:26px
      -moz-border-radius-bottomleft: 25px 150px
      border-bottom-left-radius: 25px 150px;
      -moz-border-radius-bottomright: 25px 150px
      border-bottom-right-radius: 25px 150px;
    } 
    #right_side #right_wing {
      height:300px
      width:230px
      background-color:#000000;
      float:left
      position:relative
      left:-12px;
      -moz-border-radius-bottomright: 75px 150px
      border-bottom-right-radius: 75px 150px
      -moz-border-radius-topright: 75px 150px
      border-top-right-radius: 75px 150px
    }
    #right_side #right_middle_top {
      height:130px
      width:200px
      background-color:#ffffff
      float:right
      z-index:10
      position:relative
      right:40px;
      -moz-border-radius-bottomright: 90px 120px
      border-bottom-right-radius: 90px 120px
      -moz-border-radius-bottomleft: 90px 120px
      border-bottom-left-radius: 90px 120px
      -moz-border-radius-topright: 90px 120px
      border-top-right-radius: 90px 120px
    }
    #right_side #right_bottom_one {
      height:130px
      width:95px
      background-color:#ffffff
      float:right
      z-index:10
      position:relative
      right:40px
      top:40px;
      -moz-border-radius-bottomright: 90px 120px
      border-bottom-right-radius: 90px 120px
      -moz-border-radius-topright: 90px 120px
      border-top-right-radius: 90px 120px
      -moz-border-radius-topleft: 90px 120px
      border-top-left-radius: 90px 120px
    }
    #right_side #right_bottom_two {
      height:150px
      width:126px
      background-color:#ffffff
      z-index:11
      position:relative
      float:right
      top:50px
      right:40px;
      -moz-border-radius-topright: 90px 120px
      border-top-right-radius: 90px 120px
      -moz-border-radius-topleft: 90px 120px
      border-top-left-radius: 90px 120px
    }

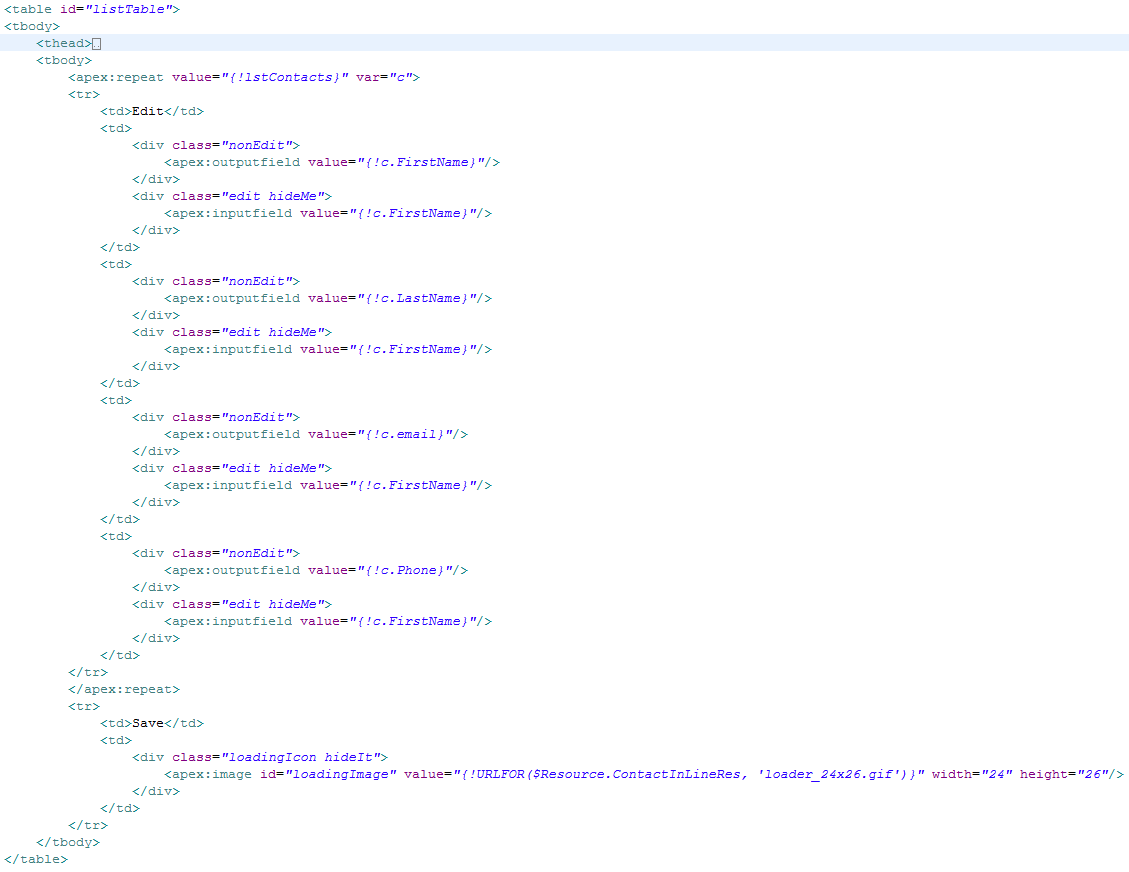
which gives you the completed image of:


Wednesday, December 28, 2011

easy double-click to edit related-list VF page

Often enough I am asked to make a custom VisualForce of a related list that is editable in a similar way to salesforce's native double click to edit. I have made them in a variety of ways, including adding images like salesforce's to indicate if a field is editable or locked etc. and some simpler ways like the one I am going to do now.

The Problem:
a sObject under Account(or any other obj) needs show on the Account page layout, but it also needs to be double-click to edit to make it easy for the reps to update key information on the fly without having to click into each sObject. (for this example we will use the Contact obj)


Setup:
First we need to create a controller extension so that it can sit in the page layout of the Account obj, and even though we are showing the contact obj, the extension needs to point to account otherwise it wont show up as an available VisualForce page to add on the layout.
ContactInLineEdit.cls
ContactInLineEdit.page

This is a standard controller extension setup, this allows the class to use the account id referenced in the URL when the page is accessed. Example page URL will be 'apex/ContactInLineEdit?id={!account.id}'

Now we should add the Contact list to the class so we can access it on the page in a apex:repeat, when we add it to the class, we only need to get the list on load of the page, and then again when we update the fields.
ContactInLineEdit.cls

On the page we will need to add the apex:form tag, along with an apex:outputpanel with an id so we can call it later in a rerender attribute on the update call. We will also add the CSS and jQuery files that will help us control the double-click to edit functionality. We then place the jQuery inside the outputpanel so when it rerenders it can reapply the jQuery to the page. I also prefer to use the jQuery.noConflict(); since I often run into issues with salesforce's JS conflicting with what I am trying to implement.
ContactInLineEdit.page

Now we need to add the apex:pagemessages so we can do error handling and we need to add the table for the apex:repeat to sit in. We will also add the apex:outputfiled's that will display in the related list on the page, we need to make sure that any field we reference here is also in the select query on the class.
ContactInLineEdit.page

Lets add in the loading icon for the update and a JS function to control it, and we should also add the edit fields to the table. To help control the conditional hiding and showing of the fields for the edit, we should add some div's with classes to reference in jQuery.
ContactInLineEdit.page

Lets add the double click functionality, first we need to add a class to the edit text in the action column  <span class="editLink">Edit</span> then we need to add a function so that everytime the nonEdit field (outputField) is double-clicked it will hide the outputField and show the inputField. We will also change the Edit text to Cancel and add a class to it so we know that row is in edit mode.

Now lets add the edit row/cancel row edits functionality, this will allow all editable fields in the row to be edited and if cancel is hit, it will undo all edits by retrieving the text from the hidden outputfield otherwise it will continue to show the updated text since we are just hiding and showing. We don't want to clear the fields cause that will potentially clear out the saved info if it gets saved by mistake. So by retrieving the info from the outputfield, we are able to set it back to what it was originally.
ContactInLineEdit.page

We will also need to update our edit action to use the new function, it will now look like this: <span class="editLink" onclick="EditMe(jQuery(this));">Edit</span>
At this point we need to make the update method and add it to the page, this will allow any edits made by the user to be saved, and then the list will rerender with the new information.
ContactInLineEdit.cls

ContactInLineEdit.page

And that it, simple. I didn't add it here, but field validation could be added to ensure its a proper email or phone number etc. In the style i made so that fields that were editable when the mouse hovered over it, the cursor would change to a pointer like it would when the mouse hovers over a link. This way the user knows the field is editable instead of having to add an image that could bog down the page load.

Questions?  
Twitter: @SalesForceGirl  or Facebook

Wednesday, March 16, 2011

Visual force 101 - Style tips

Custom style in visualforce pages can be tricky if you don't have much experience with it. Sure the same rules apply with any HTML page, but there are a few tips that might help move things along. When trying to do custom style, the first thing to know is in the apex:page tag.

<apex:page standardStylesheets="false" ... >

This is designed to disable the style from salesforce from showing on their standard tags like apex:blocktable etc. This allows you to customize them to your liking without having to fight their style, and allows you to use salesforce's native functionality; no need to reinvent the wheel when you don't have too.
However this does not prevent their CSS from overriding yours. Which brings me to the next rule, use long/custom class names on your tags.

 <div class="AlertsMessageBox floatL">

If you use classes like 'btn' or 'button' for example, it would force salesforce's style on whatever has that class to look like their buttons. Which can be useful when wanting to mimic their buttons, but on non button or link tags like div's or span's the style seems to be missing padding, and I have yet to find a way to force it. So instead I use the thin button as a 'disabled' button, and when 'enabled' it appears to 'grow' into the real button.
When adding style sheets and js to the page it's best to use standard HTML input and script tags.

<script type="text/javascript" language="javascript" src="{!URLFOR($Resource.SelfServiceTemplate, '/js/jquery-min.js')}" ></script>

I have noticed that when using the apex:inputs the order the render as on page load isn't always consistent with the order on the page. Now this hasn't happened in their newest releases but i still try to use the HTML one just in case. Also make sure all CSS includes are above any js on the page, it has been found that if the are mixed or the js is on the top that it will sometimes cause errors with the js and brake the page. I have never seen it, but it's a good 'best practice' standard to keep.
In certain cases you'll need to force style, and two of the best ways to do that is with the !important hack and in-line style. Both of witch is a LAST RESORT, but are still acceptable practices. 

ul li{list-style:none !important; padding:0; margin:0;}

The !important hack is used to put emphasis on the attribute it is in, making it more 'important' than anything else that may try to override it. 

<div style="font-size:11px;">

In-line style works better in that way, but is more founded upon in my eyes due to it's obvious disadvantages. While making the code look messy, it also makes it harder to manage the style in any way since its not in a stylesheet where it belongs. BUT in-line style is the the 'last line of defense' in the cascade of CSS, since it overrides all. 

Questions? 
Twitter: @SalesForceGirl  or Facebook